Saturday, July 31, 2021

July ABC challenge: blueberry Pop-Tarts

This month, the challenge is a pie or tart.

My goal here is to replicate commercial Kellogg's Pop-Tarts, not make flaky hand pies. (I like Pop-Tarts, but I don't like supporting the use of palm oil, which is an ingredient.)  The biggest challenge is the pastry-- theirs is like a soft shortbread cookie, not too rich, but salty and not sweet at all.

I had meant to try an oil pastry and throw in a little cream cheese for richness.  I researched various recipes, which I've saved at the end of this post for future experimentation.  This time, though, it was just butter and cream cheese, but using less than the recipe called for.  I didn't want it too rich or too delicate; on the other hand, does fat helps keep the pastry shortbread-like and not too firm?  I'm not sure.

For the pastry, I made half the original recipe*, with a few modifications, shown in italics and strikeout.  Here's what I used:

Crust
1¼ cup all-purpose flour
1/4 teaspoon salt
4 2-2
½ tablespoons
unsalted butter
4 2 tablespoons cream cheese
1 teaspoon cider vinegar
1-2 3-5 teaspoons ice water

Filling (about 1 cup)   
1 cup frozen blueberries
1/2 cup sweetened, dried wild blueberries (Trader Joe's product)
1 teaspoon cornstarch
1/2 cup sugar

When mixing the dough ingredients, the fat should be in very small particles, like bread crumbs, in order to produce a mealy, not flaky, crust. Chill for an hour; allow to warm on counter before rolling out.  (It shouldn't crack too much when rolled.)

Defrost the berries and reserve the juice. Stir the cornstarch into the reserved juice, making sure it's well blended.  In a small pan, stir together both kinds of berries, the juice mixture, and the sugar and cook over medium low heat until the berries have softened.  Using an immersion blender, blend the berry mixture until fairly homogeneous and all the big pieces have been broken up, then continue to cook at a low bubble for about 3-4 minutes.  It should be about the consistency of a good pea soup.  Allow to cool, then refrigerate.  (The mixture was just firm enough that it didn't run, but not gummy.)

Preheat the oven to 350F.  Roll out the dough very thinly to about an 10 x 8-inch rectangle (see revision), trimming if necessary, and cut into 4-6 equal pieces.  Place two bottom pieces of dough on the baking sheet and wet about ¼" around the edges with water.  Spread a very thin layer of jam on each piece up to about ½" from the edge.  (Seriously, this needs to be quite thin, as it will spread under the weight of the top piece.)  Dock the two top pieces of dough with the tip of a knife, making clear holes all the way through.  Make sure the edges of the bottoms are sticky; wet again with water if necessary, then carefully place the top dough pieces, aligning the edges.  Using the butt of a paring knife handle, make firm indentations close together around about ¼" of the outside of the edges to seal.  Bake at 350F (see revision); check at 10 minutes if the dough was less than ⅛" thick and at 15 minutes if it was thicker. (I baked them for about 18 minutes.) The dough should be firm and dry, and just barely beginning to turn golden on the edges. This is the point to remove them if you want to finish them later in the toaster. Continue baking another few minutes until golden brown for a finished pastry. Cool on a rack.


Par baked for later toasting

Out of the toaster


*Half the original recipe should have been enough for 1 9-inch pie crust, but it would have to have been rolled VERY thinly.  I think I would want half again as much dough for a pie.  (Possibly my fat reductions made the difference.) 

I rolled the dough to about ⅛" thick, but it should have been thinner. It should be ⅛" thick after it bakes, during which it will puff. So rather than 2 pastries, this quantity of dough might produce 3. The dough was very easy to work with, so it would probably handle well even when thin.

Revisions: I was really pleased with these, but I'm not done tinkering with the recipe. The dough was soft but not crisp-- too bendable. That was probably because it wasn't fully baked, or it might be the recipe. I think baking them more slowly at a lower temperature so they bake all the way through but aren't browned might be a trick. And rolling much thinner--- for this amount of dough, maybe a 12" x 12" square cut into 6 pieces, maybe even thinner than that.

Conclusion: Delicious, and a good start. Filling was pretty much perfect, but the dough needs some work. The key take away is that the pastry has to be fully cooked in the oven because the toaster only toasts the outside--- it doesn't finish baking it. 

Recipe:  Easy Cream Cheese Pie Crust via Kitchn

Other recipes to try: 

oil crust via Cozy Peach Kitchen
flaky all-butter crust (and method) via Inspired Taste
3-ingredient cream cheese crust via allrecipes
complex cream cheese crust via Rose Levy Beranbaum for epicurious
no liquid cream cheese crust via Southern Kitchen

Wednesday, July 21, 2021

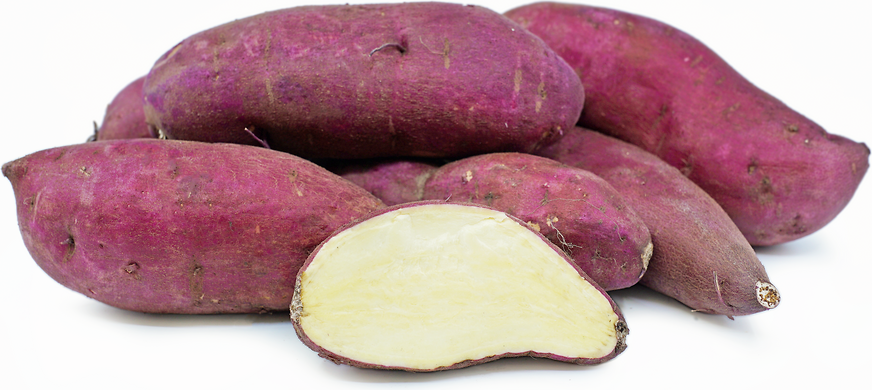
Japanese sweet potato cake

 Red Yams Information and Facts


Satsumo-imo:  purple skin with creamy interior, tastes like chestnuts.

I made this experimental dessert:

2/3 baked potato, mashed
1 egg
1 tablespoon granulated monk fruit sweetener
salt to taste (maybe 1/16 teaspoon)
1 tablespoon heavy cream
3 tablespoons milk

All mixed together and baked in a shallow, flat bowl in the microwave for 5-6 minutes at 7.  It was staying puffed up (slightly) and had barely started to pull from the edge of the bowl.  After cooling for about 10 minutes, it had shrunk more.

It had a slightly cakey texture, but dense.  Could use some vanilla ice cream and some honey-toasted sliced almonds.  Might be good with cardamom, and definitely vanilla, but I didn't want to interrupt the potato flavor.

Definitely would like to experiment with this vegetable again.  (Japanese sweet potato pie?)  Maybe could use something a little tangy, like cream cheese or Greek yogurt.  (Pie with a yogurt layer?  And almond praline for crunch.)

Wednesday, June 9, 2021

June ABC challenge: strawberry cream cheese coffee cake


The challenge this month was breakfast/brunch.  My favorite!  I used up some leftover frozen strawberries by making half the original recipe.

Here's what I used:

Strawberry Filling

3/4 cup frozen strawberries, thawed, drained, and cut into pieces

1½ tablespoons sugar

1½ teaspoons water

3/4 teaspoon cornstarch


Cream Cheese Filling

4 oz cream cheese, room temperature

1/8 cup sugar

1/2 large egg


Butter Cake & Crumb Topping

1 cup all purpose flour

3/8 cup sugar

1/4 cup butter, cold and cut into chunks

1/4 teaspoon baking soda

1/4 teaspoon baking powder

1/8 teaspoon salt

3/8 cup sour cream (full fat)

1/2 large egg

1/2 teaspoon vanilla extract


For the strawberry filling, mix the strawberries and sugar in a pan. Cook briefly over low heat to warm (until the strawberries release their juices if using fresh, about 5 minutes). In a small bowl, combine the cornstarch and water to make a slurry, then add to the strawberries and stir until well combined. Continue to cook, stirring occasionally, for another minute or two until it has thickened. Let cool to room temperature.


For the cream cheese filling, beat the cream cheese on medium speed until smooth. Add the sugar and ½ egg and beat until well combined.  Set aside.


For the cake, combine the flour and sugar in a bowl. Cut the butter into the mixture until it resembles coarse crumbs. Measure out 3/8 cup of the mixture and set aside. Add the baking soda, baking powder, and salt and mix well. In another bowl, beat the sour cream, ½ egg, and vanilla extract until well blended. Add to the flour mixture and stir gently until just incorporated. Spread the dough in a greased 8 x 4" or 9 x 5" pan that's at least 1.5 inches deep, patting down with damp fingers if necessary. Spoon the cream cheese mixture over the dough, then top with the strawberry jam. (Avoid letting the jam touch the edges of the pan to prevent sticking.) Sprinkle the reserved 3/8 cup crumbs over the strawberry filling. Bake for 25-30 minutes. Cool in the pan on a wire rack at least 20 minutes before slicing.


I had some difficulty deciding what pan to use.  I used a 9 x 5" loaf pan, so my cake was a little thinner than the original, and I think the high sides prevented proper browning on top.  Also, turned out the oven was at 375F for the first 20 minutes; I turned it down to 350 and baked it another 5, which was just the right amount of time.  It might need a little longer for a 350F oven, especially if it's a thicker cake.  The pan I used was non-stick and very slick, but I greased it anyway and the slice came right out.  The original recipe calls for a pan with a removable bottom, which would make for a nicer presentation but isn't necessary to get the cake free.

Conclusion:  This was much lighter than you might expect, and not too sweet.  (The cake part tasted just like a cinnamon streusel coffee cake my mom used to make.)  Very good.

Recipe:  Strawberry Cream Cheese Coffee Cake via Food Wanderings (adapted from a blueberry version on Annie's Blog)

Wednesday, June 2, 2021

Blueberry Buttermilk Bars


Leftover buttermilk and fresh blueberries.  Here we go.

I like recipes to be made up of different textures and flavors and not be the same throughout.  For this I wanted the sweetness to be in the filling, not in the crust, so I reduced the sugar in the crust and added some to the filling.

Here's what I used:

Crust
3/4 cup all-purpose flour
1/3 cup 2 tablespoons sugar
1/4 cup cornmeal
2 tablespoons cornstarch
1/4 teaspoon sea or kosher salt
1 stick cold unsalted butter, cut into 8 pieces

Filling
1½ tablespoons cornstarch
1½ cups buttermilk
4 large eggs at room temperature
1/2 cup + 3 tablespoons sugar
1 2 pinches sea or kosher salt
2 teaspoons vanilla extract
2 tablespoons unsalted butter, melted and slightly cooled
1½ cup fresh blueberries

Line an 8x8 inch baking pan with foil.  Put the flour, sugar, cornmeal, cornstarch and salt in a food processor and pulse a few times to blend. Add our cubes of butter a few at a time until you have a moist dough that forms big crumbs. Dump the dough into the baking dish and press into the bottom of the pan - as evenly as you can. Center a rack in the oven and preheat it to 350 degrees F. While the oven is preheating, put the dish in the freezer or fridge to keep the butter in it cold.  Bake the crust for 25 minutes, until it’s golden brown - and I mean golden, like, more than you would think for pre-baking. You want the crust crisp and able to hold up to a custard and the juice expelled from the blueberries, so make sure you cook it long enough. Put the pan on a cooling rack and cool it completely.

Meanwhile, make the filling.  Place the cornstarch in a small bowl and pour over 1/4 cup of the buttermilk. Stir it until the cornstarch dissolves. Whisk the eggs in a medium bowl until foamy. Add the sugar and immediately start whisking vigorously. Whisk in the salt and vanilla, then whisk in the slurry. When the slurry is fully incorporated, stir in the remainder of the buttermilk, followed by the melted butter. Scatter the blueberries over the crust and then pour on the topping. The blueberries will move all over the place when you pour the custard in,  so try to push them back around to distribute evenly if you can, this can get annoying so don't sweat it. Bake the bars for 42 to 45 minutes, until the topping is puffed all the way to the center, brown around the edges and firm everywhere. Transfer the pan to a rack and cool for 20 minutes at least. Pull the foil and lift out of the pan to finish cooling.

In a word, these were disappointing.  (I was skeptical when I saw some of the ingredients and the mixing directions, and was convinced that the originator didn't actually make these and doesn't know a lot about recipe development.  Then I found out the recipe developer was Dorie Greenspan. Hmmm.) The use of so much cornmeal plus the corn starch in the crust gave it an unpleasant crumbly, gritty texture that tasted strongly of corn.  The directions to bake it until it's "really golden" left me with a brown crust, not one that gradually blended into the pale filling as shown in her photos.  The filling is made with liquids, so I don't know why the elaborate ordering, including the reference in the original that sugar "burns" the eggs such that they'll form a film if you don't whisk vigorously.  Never heard that before and never had it happen.  Aside from mixing the corn starch in a little liquid to start, it can all be thrown in together.  I poured the filling into the pan first and then added the blueberries--- no repositioning required.  (They float.  Anyway, if you use enough, they fill the space.)  If I were keeping this recipe, I'd rewrite the directions to be more sensible, but I won't be making these again.

I had to bake the bars an extra 25 minutes.  The center never did puff up, but the edges were starting to look burned and the whole thing was firm.  The end result was berries in a soft custard.  (I think there was too much milk.)  There's no way those ingredients were going to produce the blond-brownie-looking bars the originator posted, with clear teeth marks in every bite.  You need something with substance to do that, and 1½ tablespoons of cornstarch wasn't going to do it.  (However, by the next day, they did firm up and I could get clean cut edges.)

            
Hers
Mine


Conclusion:   I thought this recipe was the creation of someone who doesn't know how to write a recipe and wouldn't admit to a failure.  This is one bookmark I can remove.

Recipe:  Blueberry Buttermilk Pie Bars via Kate the Baker, from Dorie Greenspan's Cookies.

Sunday, May 16, 2021

May ABC challenge: Lemon Buttermilk Cake

This month's challenge was "teacake", that being a simple cake that doesn't include a lot of other components, but is eaten rather plain.  With an abundance of lemons, I made this Maida Heatter recipe (which was noted as being slightly adapted from her New Book of Great Desserts.)  Compared to this lemon cake I made several years ago, this one was much less expensive to make, although not as rich.  I modified it further from the recipe to suit my taste and ingredients on hand.

Here's what I used:

1/2 pound unsalted butter, at room temperature

2 cups granulated sugar

3 large eggs

2 ⅔ cups all-purpose flour

1/2 teaspoon baking soda

1/2 3/8 teaspoon salt

1 cup buttermilk

3 tablespoons lemon juice

Finely grated rind of 3 large lemons (juice will be used for glaze)


Glaze

1/2 cup fresh lemon juice

1/3 cup granulated sugar


Grease well and flour lightly a 10-cup Bundt pan. In the large bowl of an electric mixer, beat the butter until soft. Add the sugar and beat until well mixed. (I beat it until very light and fluffy.) Add the eggs one at a time, beating well after each addition. Sift the dry ingredients together; on low speed, add in three additions to the butter mixture, alternating with the buttermilk, beginning and ending with the dry. Beat only until smooth after each addition, scraping the bowl frequently with a rubber spatula. Remove from the mixer and stir in the lemon rind and juice. (Rind can get caught up in the beaters.) Turn into the prepared pan and smooth the top. Bake for 1 hour to 1 hour and 15 minutes, or until a cake tester gently inserted into the middle comes out clean and dry. The cake will be deeply golden brown and will have begun to pull away from the sides of the pan.


While the cake is baking, make the glaze. Mix the juice and sugar and let stand, stirring occasionally.


Remove the cake from the oven and let it stand in the pan for 5 minutes. Turn out onto a rack and place it over a large piece of foil. With a pastry brush, brush the glaze over the top, sides and tube of the hot cake. Let stand until completely cool.


The only change I made was to increase the salt slightly.  I also reduced the lemon juice a little before measuring by letting it sit out and evaporate, so that it was a little more concentrated.  It finished baking in an hour.  Also, the original recipe calls for dusting the pan with bread crumbs rather than flour.  I tried this, but wasn't happy with the results.  For one, it's more fiddly.  But more importantly, the surface of the cake had a very loose, uneven, sloppy-looking crumb.  I've never had a problem with excess flour being visible on my cakes, even chocolate, so although this is Ms. Heatter's favorite technique, I won't be using it in the future.

I experienced a rare mishap in that the cake broke while turning it out of the pan.  I blame myself.  I guess because of the suggestion to use bread crumbs, I got it in my head that the cake would be difficult to get out, and so was a little rough with it.  It probably would have turned out fine if I'd used my usual technique.  The cake was delicious, and extremely light and fluffy the first day.  (It firmed up slightly by the following day, which I actually preferred.)  However I found it somewhat overly sweet.  The sugar level was fine where you got the tart lemon glaze, but the glaze hadn't soaked in as much as I'd expected, so much of the cake didn't benefit, and although it had a lovely texture, it didn't have much lemon flavor.

Conclusion:  The recipe was too good to disregard completely.  I'm inclined to skip the lemon altogether, add vanilla, and use the recipe that way (reducing the sugar by maybe 1/2 cup.)  However, if I did use the lemon again, I'd make a layer cake so the glaze was more evenly distributed and use whipped cream filling.  (Alternatively, poke the cake prior to applying the glaze so it actually enters the interior.)

Recipe:  Maida Heatter's Lemon Buttermilk Cake via Food 52

Tuesday, April 13, 2021

April ABC challenge: Cassava Cake


This month's Avid Bakers Challenge was for something ethnic.  I chose Filipino cassava (manioc) cake.  Cassava can be poisonous if not prepared correctly--- I believe it requires removing the core of the root.  I used prepared, frozen cassava.  (Truth be told, I bought this some time ago, not knowing what I'd use it for.  I chose this recipe because I had the cassava.)


The original recipe makes 2 "large" cakes; I cut the recipe in half and will have a lot of delicious leftover milk products.  Here's what I used:

1/2 of 14-ounce can sweetened condensed milk, divided
1/2 of 14-ounce can coconut milk, divided
1/2 of 13-ounce can coconut cream, divided (see note)
1/2 of 12-ounce can evaporated milk
3 eggs
1 pound grated cassava
1/2 cup grated coconut
1/3 cup sugar

Preheat oven to 325° F. Mix together 1/6 cup each of the sweetened condensed milk, the coconut milk, and the coconut cream; set aside.  Separate 2 of the eggs; set aside.  In large mixing bowl combine the remaining sweetened condensed milk, coconut milk, coconut cream, evaporated milk, 1 whole egg, the 2 egg whites, and half of one of the yolks; mix well.  Add the cassava, the coconut, and the sugar and mix to combine thoroughly.  Pour into a greased, rectangular pan.  Bake (on top shelf in bottom-heating oven) until top is no longer liquid, approximately 30-45 minutes.  Add the remaining 1½ yolks to the reserved coconut milk mixture and blend thoroughly.  Pour over the cake and return to the oven for an additional 20 to 30 minutes.  Cool completely before serving.  Refrigerate leftovers, but bring to room temperature before serving.


Note:  For a mildly sweet custard suitable for breakfast or a snack, use unsweetened coconut cream.  For a dessert custard, use sweetened coconut cream.  (If making the sweeter version, the recipe would benefit from a little salt.)

This wasn't at all what I was expecting--- mostly, I think, from having used unsweetened coconut cream---but it was still tasty.  It's really a baked custard rather than a cake, and the flavor is predominately coconut; I think the cassava is there just to make it firm so you can slice servings.  Directions were a little confusing, and vague regarding the pan size.  (The original recipe called for two "large" rectangular pans.)  I used a 10.5 x 8" pan, which was perfect.  It rose quite a lot while baking so I'm glad I had a high edge, but then it sank while it cooled.  I'm not sure if it was the pan size or the bottom-heating of my oven, but the top wasn't drying anywhere near the time given.  I finally moved the pan up to the top shelf; I think I baked it about 45 minutes before adding the topping, and then at least another 30 minutes.  I took it out while it still jiggled but a cake tester came out clean.

The topping didn't provide a distinct layer-- I think it was there so the yolks could create a more attractive color.  However the top 2/3 of the cake were quite firm, while the bottom third was more custardy, presumably just from the ingredients and how it baked (sort of like a magic custard pie.)  It tended to separate along this boundary.

Quite by chance, I found that a little grated orange zest---just a hint---would probably be a delicious addition to this recipe.  I added 1 tablespoon of Myers Rum to the topping.  That was good, but the flavor of the custard was so delicate that I think I'd prefer it without.  (I thought about adding vanilla, but didn't for the same reason.)

Conclusion:  I really liked this (it gets better the more bites you take), but I probably wouldn't make it again just as is.  It's a nice basic filling, though, that could be dressed up with a pie crust base and another layer of something--- maybe a tart orange curd.

Recipe:  Cassava cake by truebrit via Food.com
(Next time I'd like to try this one, which sounds more interesting.)